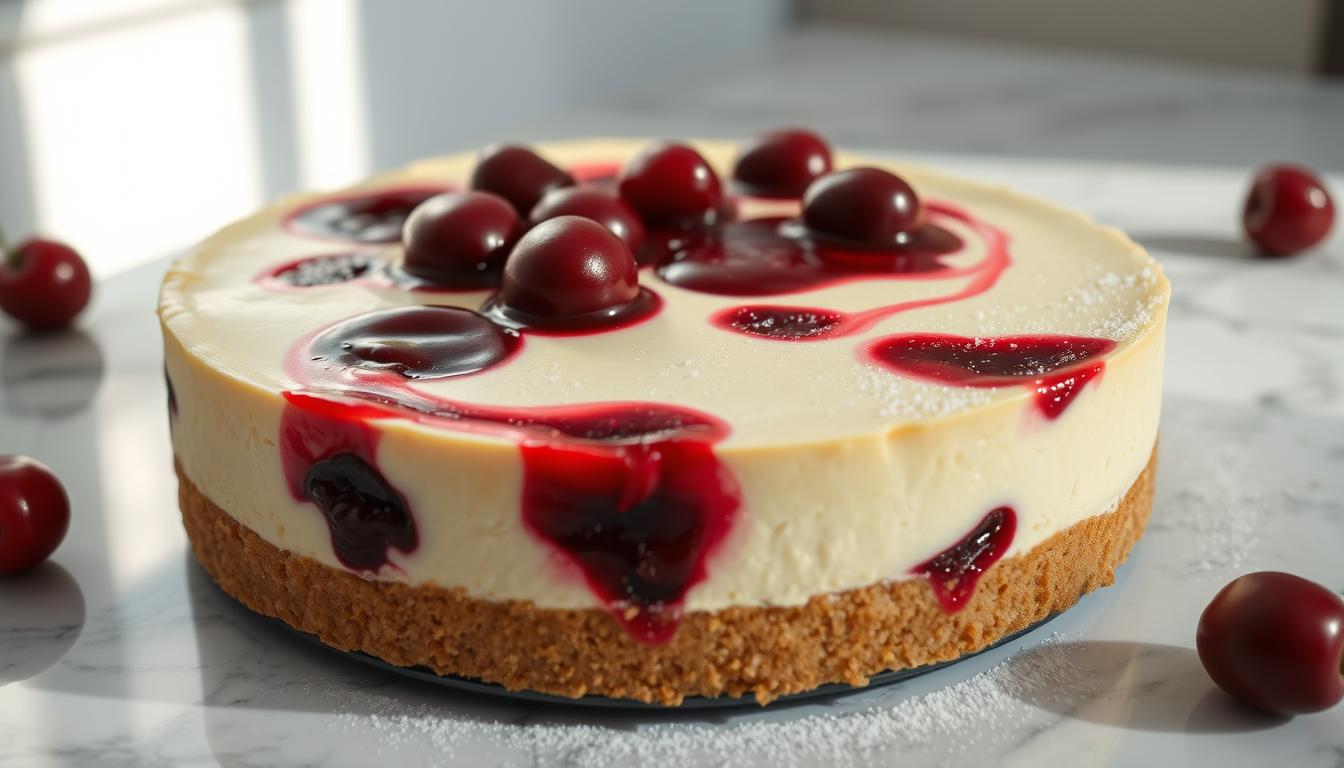
Bake the Best Ultimate Cherry Cheesecake at Home
Imagine impressing your family and friends with a show-stopping dessert that’s both tangy and sweet. You can make this decadent treat in the comfort of your own kitchen.
You’ve likely been there – wanting to serve a memorable dessert for a special occasion, but unsure how to make it happen. With this guide, you’ll master the art of creating a rich and creamy homemade cherry cheesecake that will become a new favorite.
Table of Contents
The Delicious World of Cherry Cheesecake
The classic cherry cheesecake is a favorite dessert. It mixes cream cheese’s tanginess with cherries’ sweetness. This treat has a long history and is now a common sight in bakeries.

Origins and Evolution of Cheesecake
Cheesecake started in ancient Greece, where athletes enjoyed it during the Olympics. It spread to Europe, where it changed with local ingredients. The addition of cherry topping became a hit in America.
Cheesecake recipes have changed over time. But the classic version still wins many hearts.
Why Cherry Topping Became a Classic American Dessert
The cherry topping became a favorite in America because of cherries’ flavor and availability. Canned cherries made it easy to enjoy cheesecakes all year.
- Cherries contrast the cheesecake’s richness.
- This mix became a staple in American desserts.
- Canned cherries made it easy to top cheesecakes.
What Makes a Perfect Cherry Cheesecake
A perfect cherry cheesecake has creamy cheesecake, sweet and tangy cherries, and a crunchy graham cracker crust. Getting this right takes careful attention to each part.
- Choose high-quality ingredients for the best taste.
- Avoid overmixing the cheesecake batter.
- Bake until the edges are set and the center is slightly jiggly.
Essential Ingredients for Your Cherry Cheesecake Recipe
Making a tasty cherry cheesecake needs careful picking of ingredients. The right mix ensures your dessert tastes great, looks good, and feels just right.
Graham Cracker Crust Components
The crust is key to your cherry cheesecake. You’ll need graham cracker crumbs, granulated sugar, and melted butter. Graham cracker crumbs give the base texture. Sugar adds sweetness, and melted butter holds it all together. You can also try other crackers or nuts for a unique taste.

Cheesecake Filling Ingredients
The cheesecake filling is where the magic is. You’ll need cream cheese, sour cream, granulated sugar, eggs, and vanilla extract. Cream cheese makes it creamy, while sour cream adds a tangy taste. Sugar balances the tartness, eggs bind it, and vanilla makes it flavorful.
Using top-notch ingredients like full-fat cream cheese and fresh eggs is crucial for the best taste.
Cherry Topping Options
The cherry topping is the highlight of your cheesecake. You can choose fresh cherries or frozen cherries, depending on what’s in season. If using fresh cherries, remove the pits first. For a deeper flavor, try cherry jam or cherry preserves. The goal is to match the sweetness of the cherries with the cheesecake’s tanginess.
Try different cherry types, like sweet or tart, to find your favorite mix.
Equipment You’ll Need for Baking Success
Getting the right equipment is key for a smooth and creamy easy cherry cheesecake. Let’s look at the must-have tools and some optional ones that can help you get pro results.
Essential Baking Tools
First, you’ll need some must-have baking tools. These are:
- A springform pan, which is crucial for easy cheesecake removal
- A mixer (stand or handheld) for beating the cheesecake filling
- A whisk for mixing ingredients thoroughly
- A measuring cups and spoons set for accurate measurements
Having these tools ready will make baking much easier.
Optional Equipment for Professional Results
If you want a pro finish, consider these:
- A water bath to prevent cracking and ensure even baking
- A thermometer to monitor the oven temperature accurately

While not essential, these can really boost your easy cherry cheesecake quality.
Preparing the Perfect Graham Cracker Crust
A great cherry cheesecake starts with a solid foundation. The graham cracker crust is key. It adds a delightful texture and flavor base.
Step-by-Step Crust Instructions
To make a graham cracker crust, crush graham crackers into fine crumbs. You can use a food processor or a plastic bag and a rolling pin. Mix the crumbs with sugar and melted butter until well combined. It should look like wet sand.
Press the crumb mixture into the bottom of a springform pan. Make sure it’s evenly spread. Use a measuring cup or your fingers to press it firmly. This helps prevent the crust from getting soggy.
Tips for a Firm, Non-Soggy Base
To get a firm crust, bake it at 350°F (175°C) for about 10 minutes. It should be lightly golden brown. Let it cool completely before adding the cheesecake filling. This prevents the crust from getting soggy.
Alternative Crust Options
While a traditional graham cracker crust is classic, you can try other options. Use chocolate cookie crumbs for a chocolate twist or pecan crust for a nutty flavor. These alternatives can make your cherry cheesecake unique.
The Ultimate Cherry Cheesecake Recipe Step-by-Step
Get ready to impress with our ultimate cherry cheesecake recipe. It’s broken down into simple steps. Making a delicious homemade cherry cheesecake involves several key components, from the crust to the topping.
Mixing Techniques for Creamy Texture
Achieving a creamy texture in your cheesecake is all about the mixing technique. Start by beating the cream cheese until it’s smooth. Then, add the sugar, eggs, and other ingredients gradually. Make sure to scrape down the sides of the bowl to mix everything evenly.
Using room temperature ingredients is crucial for a smooth batter. This prevents lumps and ensures even baking.
Incorporating Flavors and Add-ins
The flavor of your cheesecake can be enhanced with various add-ins, such as vanilla extract or lemon zest. Start with a small amount and taste as you go to avoid overpowering the cheesecake.
Avoiding Common Mixing Mistakes
One of the most common mistakes when making cheesecake is overmixing the batter. This can lead to a dense, cracked cheesecake. To avoid this, mix the ingredients just until they’re combined, then stop mixing.
Assembling Your Cheesecake
Once your crust is prepared and your cheesecake batter is mixed, it’s time to assemble your cheesecake. Pour the batter into the crust and smooth the top with a spatula. Make sure the cheesecake is evenly distributed in the pan.
To ensure a crack-free cheesecake, avoid overbaking. Keep an eye on your cheesecake as it bakes, and remove it from the oven when it’s just set.
Baking Your Cherry Cheesecake to Perfection
Baking a cherry cheesecake to perfection is more than just following a recipe. It’s about understanding the science behind it. To make the best cherry cheesecake, pay close attention to the baking stage. Techniques like the water bath method are key.
Water Bath Method Explained
The water bath method helps bake cheesecakes evenly and prevents cracking. It surrounds the cheesecake pan with water, creating a stable baking environment. This reduces the risk of overcooking.
To use this method, wrap the outside of your springform pan with aluminum foil. This prevents water from seeping in. Then, place the pan in a larger baking dish filled with hot water, up to halfway.
- Use a large enough baking dish to hold the cheesecake pan.
- Ensure the water level is below the top of the foil to prevent leakage.
- Be careful when removing the cheesecake from the water bath to avoid cracking.
Temperature and Timing Guidelines
Bake your cheesecake at the right temperature and for the correct time. Preheat your oven to 325°F (165°C). This temperature prevents the edges from cooking too quickly.
The baking time varies based on the cheesecake size. A standard 9-inch cheesecake takes about 50-60 minutes. It’s important to check for doneness without opening the oven door too often. This can cause the cheesecake to sink or crack.
Some key timing guidelines to keep in mind:
- Bake for 50-60 minutes for a standard 9-inch cheesecake.
- Check for doneness by gently jiggling the pan; the edges should be set, and the center slightly jiggly.
- Avoid overbaking, as this can cause the cheesecake to dry out.
How to Tell When Your Cheesecake Is Done
Determining when your cheesecake is perfectly baked can be challenging. A perfectly baked cheesecake will have a firm edge and a slightly jiggly center. To check for doneness, gently shake the pan.
If the center is still quite jiggly, continue baking in short intervals until it reaches the desired consistency. Remember, the cheesecake will continue to set as it cools.
By mastering the water bath method, following precise temperature and timing guidelines, and knowing how to check for doneness, you’ll be well on your way to baking the best cherry cheesecake that will impress anyone who tries it.
Creating the Perfect Cherry Cheesecake Topping
Making the perfect cherry cheesecake topping is easy. You can use fresh or frozen cherries. The goal is to mix great taste with a nice look.
Fresh vs. Frozen Cherry Options
Fresh cherries are best when they’re in season. They taste amazing and feel great in your mouth. Frozen cherries are good all year and taste great if thawed right.
For a no bake cherry cheesecake, frozen cherries are easier to use. Make sure to remove the pits from your cherries.
Step-by-Step Cherry Topping Recipe
Making your own cherry topping is simple. Mix 1 cup of cherries (fresh or frozen, thawed and drained) with 1/2 cup of sugar and 2 tablespoons of cornstarch in a pan. Cook on medium heat, stirring always, until it thickens.
Then, remove it from heat and add 1 tablespoon of lemon juice. Let it cool down before putting it on your cheesecake.
Store-Bought Alternatives
If you’re in a hurry, store-bought cherry topping works well. Choose one with few added preservatives. It’s not as flexible as homemade, but it’s tasty and looks good.
Applying the Topping for Best Presentation
To look great, spread the cooled topping evenly on your cheesecake. Use a spatula or the back of a spoon for a smooth finish. For a fancy touch, add a border with whipped cream or nuts.
By following these steps, you’ll make a cherry cheesecake topping that tastes amazing and looks fantastic.
Delicious Variations of Classic Cherry Cheesecake
Looking to try something new? There are many tasty variations of classic cherry cheesecake to explore. Mixing up the recipe can make baking more fun and satisfy different tastes.
No-Bake Cherry Cheesecake Option
A no-bake cherry cheesecake is great for easy desserts or when it’s hot outside. It’s easy to make and doesn’t risk cracking like baked cheesecakes. You’ll need a graham cracker crust and a creamy filling made with cream cheese and sweetened condensed milk. Top it with cherry compote or fresh cherries for a cool treat.
- Use a pre-made graham cracker crust for convenience.
- Mix the filling ingredients until smooth and creamy.
- Refrigerate until set, typically 4-6 hours.
Mini Cherry Cheesecakes
Mini cherry cheesecakes are perfect for parties or as individual treats. They’re fun and easy to make. Just divide the crust and filling into muffin tin cups, bake, and top with a cherry. They’re great for controlling portions and can be dressed up with various toppings.
Chocolate Cherry Cheesecake
For chocolate fans, a chocolate cherry cheesecake is a dream come true. It combines chocolate’s richness with cheesecake’s tang and cherries’ sweetness. Add cocoa powder or melted chocolate to the crust and filling for a chocolatey flavor. Chocolate ganache or shavings on top make it even more tempting.
Here are some tips for a chocolate cherry cheesecake:
- Use high-quality cocoa powder or dark chocolate for the best flavor.
- Balance the bitterness of chocolate with the right amount of sugar.
- Consider adding chocolate chips or chunks to the batter for texture.
Exploring these variations lets you create an easy cherry cheesecake that suits your taste. Whether you prefer something classic, no-bake, or chocolatey, there’s a version for you.
Conclusion: Enjoying Your Homemade Cherry Cheesecake
Now that you’ve baked your homemade cherry cheesecake, it’s time to enjoy it. Make sure to store it right to keep it fresh. Keep it in the fridge, covered with plastic wrap or foil, for a few days.
Think about adding whipped cream or fresh cherries when you serve it. The creamy whipped cream and sweet cherries pair well with the cheesecake. You can also try chocolate shavings or caramel sauce for a different flavor.
Sharing your homemade cherry cheesecake is a wonderful way to make others happy. It’s perfect for any occasion or just a casual get-together. So, slice it up and watch as everyone enjoys your delicious homemade treat.