How to Make a Classic Pizzelle Recipe for Your Family
The smell of warm, crisp cookies is magical during the holidays. These delicate treats come from the Abruzzo region of Italy. They have been loved for generations.
By making this pizzelle recipe, you honor your heritage. You share a piece of history with your loved ones.
You don’t need to be a pro to make these Italian delights. This easy pizzelle recipe lets you create thin, golden wafers. They bring old-world charm to your kitchen.
Teaching your kids to use the iron or enjoying a quiet moment with coffee is special. These cookies are perfect for making lasting memories.
Table of Contents
The History and Cultural Significance of Pizzelles
Every time you make a traditional pizzelle recipe, you join a long Italian tradition. These delicate wafers connect ancient cooking to your kitchen today. Learning about their history makes every crispy bite special.
Origins in the Abruzzo Region
Pizzelles come from the Abruzzo mountains in central Italy. They date back to the 8th century, called ferratelle. The name ferro means iron, from the tools used to cook them over fires.
Family crests and symbols were often on these irons. Over time, the traditional pizzelle recipe spread worldwide. Today, the classic snowflake pattern is most famous.
Pizzelles as a Symbol of Celebration
In Italy, these cookies mean joy and family. They’re common at weddings, baptisms, and holidays like Easter and Christmas. They bring families together to share stories.
Making them is a family tradition. Whether you stick to the traditional pizzelle recipe or add your twist, you keep a tradition alive. Here’s how they compare to other Italian treats.
| Cookie Type | Primary Texture | Cultural Occasion |
|---|---|---|
| Pizzelle | Crispy and Thin | Weddings & Holidays |
| Biscotti | Hard and Crunchy | Coffee Pairing |
| Amaretti | Chewy and Nutty | Festive Gatherings |
Essential Equipment for Your Pizzelle Kitchen
Investing in quality equipment can take your baking to the next level. The right tools make it easy to master the best pizzelle recipe.

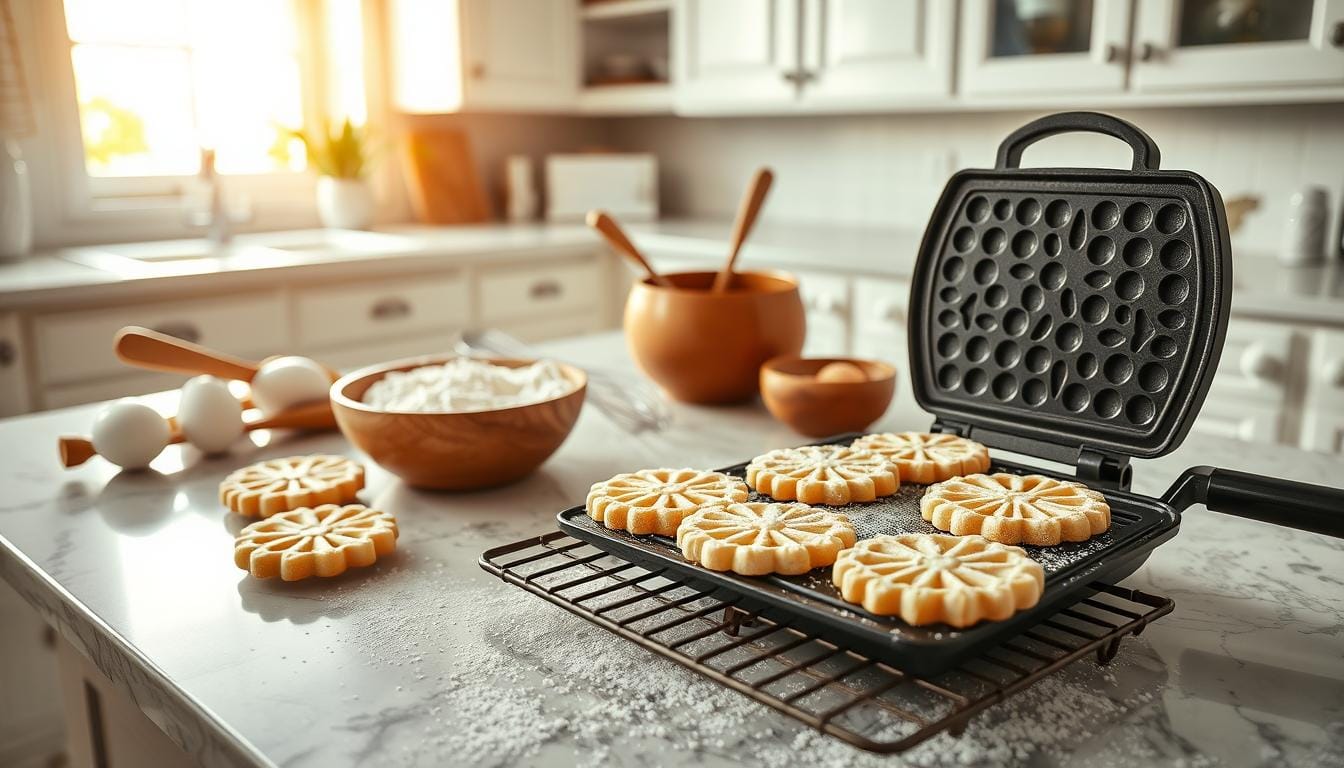
Choosing the Right Pizzelle Iron
The iron is the core of your baking setup. It shapes the pizzelle’s unique pattern and texture, key to a great homemade pizzelle recipe.
Electric vs. Stovetop Models
Electric pizzelle irons are favored for their even heat and simplicity. They have thermostats that keep the temperature steady, ensuring perfect cookies every time.
Mixing Bowls and Whisking Tools
Start with precision in mixing. Use a large, stainless steel or glass bowl to mix ingredients without chemical issues or odors.
A good balloon whisk is crucial for beating air into the batter. This step is essential for a light, airy texture in your homemade pizzelle recipe. Consistency is key when mixing eggs, sugar, and flour.
Cooling Racks and Storage Containers
After baking, handle your cookies carefully to keep them crunchy. Place them on a wire cooling rack to let air circulate.
Stacking them while warm can make them lose crispness due to steam. Store them in an airtight container once cool to keep them fresh. The right equipment ensures your best pizzelle recipe success every time.
Selecting High-Quality Ingredients for Authentic Flavor
The taste of your pizzelle depends on the ingredients you pick. For a traditional pizzelle recipe, the quality of your ingredients is crucial. Fresh, top-notch ingredients make your cookies taste like they’re from an Italian bakery.
The Importance of Fresh Eggs and Flour
Eggs are key in binding your batter. Use large, fresh eggs for the right structure. The 3.5 cups of flour and 1.5 cups of sugar need to mix well. Consistency is key when measuring dry ingredients.
“The secret to a perfect cookie is not just the technique, but the integrity of the ingredients you bring into your kitchen.”
Selecting the Best Anise Extract or Vanilla
The flavor of your best pizzelle recipe comes from the aroma. Traditionalists like anise extract’s licorice taste, while others prefer vanilla’s warmth. Use about 2 tablespoons of your chosen extract for a great flavor.
Butter vs. Oil in Traditional Recipes
The type of fat in your dough affects the cookie’s texture and how long it lasts. A traditional pizzelle recipe often mixes fats for the perfect texture. A mix of 1/2 cup butter and 1/2 cup shortening gives a golden, tender cookie.
| Fat Type | Texture Impact | Flavor Profile |
|---|---|---|
| Butter | Crisp and Rich | Creamy and Sweet |
| Shortening | Light and Airy | Neutral |
| Vegetable Oil | Soft and Chewy | Mild |
Try different fat ratios to make the best pizzelle recipe for your family. Always choose high-quality fats for a authentic pizzelle recipe that stays fresh and tasty for days.
Preparing Your Batter for the Perfect Texture
Starting your journey to a delicious authentic pizzelle recipe means mastering the batter. How you mix your ingredients affects the cookies’ crispness and structure. By following a careful process, you ensure every batch is consistent and flavorful.

Step-by-Step Mixing Instructions
Begin by whisking eggs and sugar until light and fluffy. Then, add melted butter and chosen extracts, mixing well. Slowly add dry ingredients like flour and baking powder to avoid overworking the gluten.
Use a sturdy whisk or a hand mixer on low to remove lumps. A smooth batter is key for an easy pizzelle recipe that looks professional. Let the mixture rest a few minutes to hydrate the flour properly.
Achieving the Ideal Batter Consistency
The batter’s thickness is crucial. It should be thicker than pancake batter but thinner than cookie dough. This consistency helps the batter spread evenly without running over the iron plates.
If the batter is too stiff, add a little milk or water. If it’s too runny, add flour. Finding the right balance is key for any pizzelle recipe.
Tips for Incorporating Aromatics
Aromatics give these cookies their unique scent and taste. Crush anise seeds in a mortar and pestle before mixing them in. This step enhances the flavor in every bite.
For a citrusy twist, add freshly grated lemon or orange zest at the end. For a classic taste, use high-quality vanilla or anise extract. Adding these elements at the end preserves their fragrance for your easy pizzelle recipe.
Mastering the Pizzelle Recipe Technique
Turning simple batter into a delicate, golden treat is a skill you can easily refine with practice. Following a reliable pizzelle recipe is key. The actual cooking process is the most critical phase of your preparation. By focusing on heat management and timing, you ensure that every batch turns out perfectly.
Preheating and Greasing Your Iron
Before you begin, let your iron heat up for at least 15 minutes. This essential step ensures the plates reach a consistent temperature. This prevents the batter from sticking to the metal surface. If the iron is not hot enough, your cookies will likely tear or fail to crisp properly.
Once the iron is hot, apply a very light coating of neutral oil or non-stick spray. You only need a tiny amount to maintain a crispy pizzelle recipe. Too much oil can cause the batter to fry rather than bake, leading to an uneven texture.
Measuring the Perfect Amount of Batter
Achieving a uniform shape depends on how much batter you place on the iron. A standard tablespoon is usually the perfect measurement for most irons. Place the dollop slightly behind the center of the pattern to ensure the batter spreads evenly as you close the lid.
Avoid pressing down too hard on the handles, as this can force the batter out the sides. A gentle, steady pressure is all that is required to create a beautiful, thin cookie. If you notice overflow, simply reduce the amount of batter for your next attempt.
Timing the Cooking Process for Golden Results
The final stage of your crispy pizzelle recipe requires careful observation. Cook the batter for approximately 30 to 45 seconds, depending on the heat setting of your specific iron. Look for a light golden color, which indicates that the sugars have caramelized perfectly.
If you prefer a darker, crunchier cookie, you can extend the time by a few seconds. But, keep a close watch to prevent burning. The following table provides a quick guide to help you achieve the best results with your pizzelle recipe.
| Heat Level | Cooking Time | Expected Result |
|---|---|---|
| Low | 50-60 Seconds | Pale and soft |
| Medium | 30-45 Seconds | Golden and crisp |
| High | 20-25 Seconds | Dark and brittle |
Troubleshooting Common Pizzelle Challenges
If your cookies aren’t turning out right, don’t worry. Most common problems have easy fixes. Even experienced bakers sometimes face issues with an authentic pizzelle recipe. By adjusting your technique, you can easily solve these problems.
Preventing Sticking and Burning
Sticking is a big problem for beginners. Make sure your iron is fully preheated before adding batter. If it still sticks, a light spray of neutral cooking oil can help.
Burning happens when the heat is too high or cooking time is too long. Watch your first batches closely to adjust the heat. Lowering the heat a bit will help you get a crispy pizzelle recipe without burnt edges.
Fixing Batter That Is Too Thin or Thick
The batter’s consistency is key for the cookie’s shape. If it’s too thin, it spreads too much and gets messy. Add flour a tablespoon at a time until it’s thick enough.
If the batter is too thick, it won’t spread right. A little milk or water can thin it out. Getting the right balance is the secret to a crispy pizzelle recipe that looks great every time.
Ensuring Even Browning Across the Iron
Uneven browning can happen if the batter isn’t centered right. Place your batter a bit behind the iron’s center. This helps the top plate spread it evenly.
If one side of your iron gets hotter, try rotating it halfway through cooking. This trick ensures your authentic pizzelle recipe gets a beautiful, even golden-brown finish.
Creative Flavor Variations to Delight Your Family
Mastering the basic technique opens up a world of possibilities. Your delicious pizzelle recipe can become a canvas for creativity. While the traditional anise flavor is timeless, you can experiment with unique twists. These simple changes let you customize each batch to your family’s taste.
Adding Citrus Zest for a Bright Twist
Fresh citrus zest adds a vibrant, aromatic touch to your cookies. Use finely grated lemon, lime, or orange peel for a refreshing finish. Always remember to zest only the colored part of the skin to avoid bitterness.
Incorporating Cocoa Powder for Chocolate Pizzelles
For a richer dessert, try chocolate variations of your delicious pizzelle recipe. Replace one tablespoon of flour with unsweetened cocoa powder for a deep flavor. This change makes your cookies indulgent and perfect with powdered sugar.
“Cooking is at once child’s play and adult joy. And cooking done with care is an act of love.”
Experimenting with Almond and Hazelnut Extracts
Switching to nut-based extracts can transform your cookies. Almond extract gives a marzipan-like aroma, while hazelnut adds a warm, earthy taste. Mixing these with vanilla creates a complex, delicious pizzelle recipe perfect for holiday gatherings.
| Flavor Variation | Primary Ingredient | Best Pairing |
|---|---|---|
| Citrus | Lemon Zest | White Chocolate Drizzle |
| Chocolate | Cocoa Powder | Raspberry Jam |
| Nutty | Almond Extract | Toasted Almond Slivers |
Serving and Storing Your Homemade Pizzelles
Creating a great homemade pizzelle recipe is more than just a batter. It’s about how you present and store them. Once your cookies are golden and smell amazing, you have many ways to make them special for your guests.
Creative Ways to Serve Pizzelles
Turn warm cookies into fancy shapes with a wooden dowel or metal form. While the cookie is soft, roll it up to make cannoli shells or decorative cones. Fill them with sweetened ricotta or whipped cream for a treat.
Pairing with Coffee or Dessert Wines
The easy pizzelle recipe pairs well with espresso or Vin Santo. Its buttery flavor and hints of anise or vanilla complement dark coffee. For a special touch, dip the edges in melted chocolate before serving.
Using Pizzelles for Ice Cream Sandwiches
Make a stunning ice cream sandwich with two cookies. Place a scoop of your favorite gelato between them and press gently. This highlights the crispy pizzelle recipe and offers a cool contrast.
Proper Storage to Maintain Crispness
To keep your homemade pizzelle recipe fresh for a week, store them in an airtight container. Use parchment paper between layers to prevent sticking and moisture. If they lose crispness, reheat them briefly in a low oven to restore their snap.
| Serving Method | Best Pairing | Storage Tip |
|---|---|---|
| Cannoli Shells | Sweetened Ricotta | Store in airtight tin |
| Ice Cream Sandwich | Vanilla Gelato | Freeze immediately |
| Plain/Dusted | Espresso | Use parchment layers |
Safety Tips for Working with Hot Irons
Mastering the homemade pizzelle recipe is more than just using great ingredients. It also means keeping a sharp eye on kitchen safety. These irons get extremely hot, so treat them like any other cooking appliance.
Handling High-Heat Equipment Safely
Always put your iron on a flat, heat-resistant surface before plugging it in. Never leave it alone while it heats up or is in use. The outside can get very hot.
Use heavy-duty oven mitts to adjust or move the iron. A clean workspace helps avoid accidents with the hot plates while making your delicious pizzelle recipe.
Preventing Steam Burns During Cooking
Be careful when opening the iron to check your cookies. The steam from the batter can burn you if you’re not careful.
Always open the iron away from your face and hands. Use a long-handled fork or tool to keep your fingers safe from the heat.
Cleaning and Maintaining Your Iron After Use
Keeping your equipment in good shape is key for years of baking. After use, unplug the iron and let it cool down before cleaning.
Use a wet paper towel to clean the grates when it’s cool. This prevents burnt batter buildup. By doing this, you can make every homemade pizzelle recipe a success without accidents.
Conclusion
Learning to bake is a way to connect with your family’s past. You now know how to make a traditional pizzelle recipe. This recipe honors your family’s history.
Your kitchen will soon smell like anise and vanilla. These cookies are more than a snack. They are the heart of holiday celebrations and special moments with family.
You’ve learned how to make the best pizzelle recipe easily. Every batch you make makes you more confident. Your friends will love the effort you put into each cookie.
Sharing these treats keeps an Italian tradition alive in your home. You can try new flavors or stick to the classic recipe. Each cookie is a chance to bring people together.
Start your next baking project with pride. Your journey into authentic Italian sweets starts now. Enjoy making memories with every cookie you bake.